Ford Transit 2013-2017 - Premium Head Unit Upgrade Kit: Radio Infotain – Brummstadt

Premium by Brummstadt.com.au

Expert support for Aussie drivers | 7 days a week incl. holidays

Free shipping over $200 | 30-Day returns

Guaranteed fit or we’ll fix it

    Item has been added


    Ford Transit 2013-2017 - Premium Head Unit Upgrade Kit: Radio Infotainment System with Wired & Wireless Apple CarPlay and Android Auto Compatibility

    4.5 stars
    Excellent | 285 trusted reviews on
    $565.00
    Unit price  per 

    • Complete Kit: Screen, Fascia Kit, Plug & Play-Harness
    • Processor Options: 4-Core (2/32GB) or 8-Core (4/64GB & 8/128GB)
    • Vibrant Touchscreen: Crisp, responsive HD display
    • Built-in GPS: Offline-capable navigation
    • Adaptive Brightness: Auto-adjusts with headlights
    • Complete System Replacement: Modern infotainment upgrade
    • New Hardware Included: GPS antenna, microphone, all cables
    • Plug & Play Design: Engineered for direct fitment with factory harness
    • Installation: View installation requirements
    • DIY Installation Design: Made for self-installation with our support team
    • Professional Option: Partner installers in Gold Coast & Launceston, or find your local specialist
    • USB Connectivity: 2 ports included (6-pin & 4-pin) View details
    • 4G LTE SIM Slot: Mobile internet on the road (Premium 4GB/64GB+ models - enhanced connectivity)
    • Smart Connections: Bluetooth, WiFi, USB
    • Wireless CarPlay & Android Auto: Seamless smartphone pairing
    • Voice Control: Siri & Google Voice supported
    • Hi-Res Audio: DSP-optimized sound clarity
    • Custom Equalizer: Audio tuning control
    • RCA Outputs: For subwoofers and amplifiers
    • Multimedia Streaming: YouTube, Spotify, Netflix & more
    • Mirror Screen: Android & iPhone screen sharing
    • Split Screen Mode: Use maps and media side-by-side
    • Steering Wheel Buttons: Fully retained
    • Hands-Free Calling: Mic & Bluetooth calling
    • OTA Updates Ready: Future-proof software support
    • 3-Year Warranty: Comprehensive protection included
    • 30-Day Returns: Hassle-free return policy
    • Live Support 7 Days: 10am–6pm, incl. holidays
    • Brummstadt Guarantee: Trusted by thousands of Australian drivers
      Payment methods
    • American Express
    • Apple Pay
    • Google Pay
    • Mastercard
    • Shop Pay
    • Union Pay
    • Visa
    Guaranteed safe & secure checkout. Your payment information is processed securely. We do not store payment details nor have access to your payment information.

    What Our Customers Say

    4.5 stars
    4.6 out of 5 based on 285+ reviews
    ← Swipe for more reviews →
    Technical Specifications
    OS & ProcessorAndroid 13 – Choose from 4-Core (2/32GB model) or 8-Core (4/64GB & 8/128GB models) processors
    Memory & StorageUp to 8GB RAM and 128GB SSD – ideal for fast performance and media storage
    Display 9″ (1280×720) or 13.3″ IPS QLED – sharp visuals across sizes
    Audio & DSP32-Band Equalizer with built-in DSP – rich audio tuning for custom sound profiles
    Amplifier & TouchToshiba Amplifier with IPS Anti-Glare 5-Touch Display – crystal-clear visuals with responsive controls
    ConnectivitySupports CarPlay & Android Auto (wired & wireless), Bluetooth 5.0, WiFi, and GPS – seamless phone integration and live navigation. Premium models (4GB/64GB+) add 4G LTE for standalone internet connectivity
    Radio & InputsFM radio, AM available via optional DAB+ receiver, RDS, DVR, TPS, CAM (Optional) – wide input support for all setups
    Extra FeaturesSteering Wheel Control Support, plus split-screen for multitasking
    In the BoxHead Unit, Fascia Kit, Harness Bundle, 2x USBs, and Antenna Plugs (FM, GPS), Antennas (GPS). Premium models (4GB/64GB+) also include: 4G antenna & SIM card holder for enhanced connectivity
    Apps SupportedNetflix, Spotify, Apple Music, YouTube & more – enjoy your favorites right from the dashboard

    Compatible with the following vehicle models:

    • Ford™ Transit from 2013-2017

    Not sure if it fits? 📸 Send us a snap of your car and we’ll reply fast with what fits.

    Please note that even vehicles of the same model may have subtle differences. We are committed to ensuring compatibility and have carefully accounted for each vehicle’s unique specifications. For assistance or inquiries, our expert support team is ready to guide you at every step.

    This product is not affiliated with or endorsed by Ford™. All trademarks are the property of their respective owners and are used for reference only. Carefully crafted as a premium aftermarket solution, this product ensures seamless compatibility and reliable performance for this model.

    Optional Accessories Installation Guides

    Enhance your Brummstadt head unit with these premium accessories. Each accessory is designed for easy DIY installation.

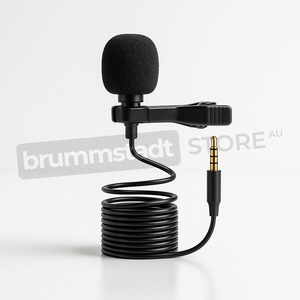
    External Microphone (Your Passengers Will Thank You)
    Game changer alert: Ever had someone say "Sorry, can't hear you!" on calls? Your built-in mic is doing its best, but it's fighting road noise. This external mic with noise filtering makes you sound crystal clear - even at highway speeds!

    Dead easy setup (honestly, 2 minutes):

    1. Connect to head unit: Find the 3.5mm MIC port in your wiring harness (it's with the RCA connectors). Just plug in the mic's 3.5mm connector until it clicks
    2. Pick your spot: Most people love the sun visor (clips on solid), but A-pillar or above the mirror work great too. The 3-meter coiled cable reaches anywhere
    3. Clip it on: The rotatable clip grips tight - sun visor, A-pillar trim, wherever works for you. About 30cm from your mouth is perfect
    4. Quick test: Call a mate and ask "How do I sound?" Prepare for compliments! Works brilliantly with Siri, Google Assistant, and hands-free calls

    Pro tip: Mic too quiet? Head to Settings → Sound → Microphone Gain. Start at 50% (perfect for most cars). Noisy diesel? Try 70%. The difference is amazing!

    🔊 Voice Quality Tip: After installation, fine-tune your microphone sensitivity in the head unit's audio settings. Test it out by calling your wife, husband, kids, friends, or even having a philosophical chat with the heavens above! Try voice commands with Siri, Google Assistant, or your preferred voice assistant to ensure crystal-clear audio. If they can't hear you properly, simply adjust the mic gain in settings until you sound like a professional podcast host!
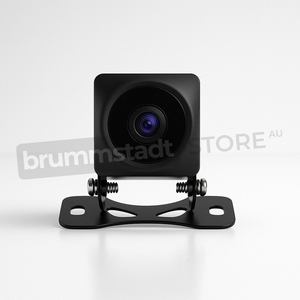
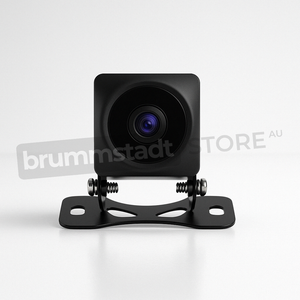
    Rear View Camera Installation
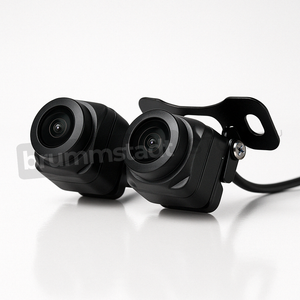
    Compatibility: Rear camera alone works with all models (2/32GB and up). For front + rear camera combo, you need 4/64GB or higher.

    For Brummstadt Cameras (Plug & Play):

    1. Mount camera above license plate using provided bracket
    2. Run the camera cable through rubber boot between car body and trunk/door
    3. Route cable under trim panels to head unit location
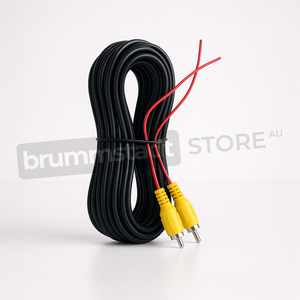
    4. Connect yellow RCA plug to CAM-IN on head unit
    5. Connect red power wire to reverse light positive (this serves as the power trigger that tells the head unit to automatically switch to camera view when you shift to reverse)
    6. Connect black wire to chassis ground
    7. In Factory Settings → Backcar Settings, set to "Aftermarket Camera"

    Note: In most cases, connecting the red wire to the reverse light is necessary for automatic camera switching. However, in modern vehicles with CANBUS, this may not be required as the CANBUS module already controls screen switching (even if your car didn't come with a factory camera, the switching software is often pre-installed!))

    Camera will automatically activate when reverse gear is selected.

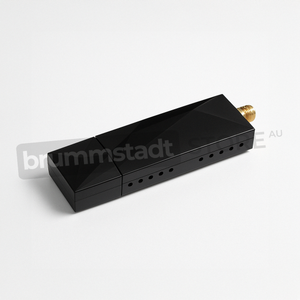
    DAB+ Digital Radio Module

    Installation Process:

    1. Connect USB module: Connect the DAB+ receiver to the USB 6-pin port on the back of the head unit (not the 4-pin port)
    2. Mount antenna:
      • Clean windscreen area (top corner recommended)
      • Stick the film antenna to the glass
      • Route cable along windscreen edge under trim
    3. Connect antenna to module: SMB connector clicks into place
    4. Activate in head unit: Open DAB+ app and scan for stations
    5. Ground for better signal: Connect the DAB+ module to bare metal in your vehicle - the car's metal body serves as grounding for stronger signal reception
    6. Position for best reception: Antenna works best with clear sky view
    7. Download app: Download a DAB+ app from the Google Play Store to start streaming digital radio
    ⚠️ Important: DAB+ coverage varies significantly by location. Check coverage maps for your area before purchasing to ensure you can receive digital radio signals.
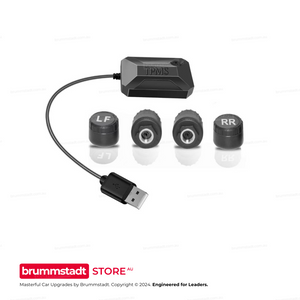
    TPMS (Tyre Pressure Monitoring System)
    Choice of Systems: We offer both External (valve cap) and Internal (inside tyre) TPMS sensors. External is easier to install, Internal is more accurate and secure.

    External TPMS Installation (Valve Cap Type):

    1. Install sensors:
      • Remove existing valve caps
      • Screw on TPMS sensor caps (hand-tight only)
      • Note each sensor's ID number for position mapping
      • No tyre removal required - 5 minute installation!
    2. Connect USB receiver: Plug into available USB port on head unit
    3. Configure in app: Download and open one of these recommended apps:
      • TPMS by Vietmap: Simple interface, good for basic monitoring
      • USB TPMS: Advanced features with logging
      • Tyre Pressure Monitor: Clean UI with customizable alerts
    4. Map sensors: Assign each sensor ID to correct wheel position (FL, FR, RL, RR)
    5. Set alerts: Configure pressure (typically 32-35 PSI) and temperature warnings

    Internal TPMS Installation (Professional):

    1. Tyre removal required:
      • Remove wheels from vehicle
      • Dismount tyres from rims
      • Install internal TPMS sensors on valve stems
      • Remount and balance tyres
      • Professional installation recommended ($50-100 typical cost)
    2. Connect USB receiver: Same as external - plug into USB port
    3. App configuration: Same apps work for both internal and external sensors
    4. Advantages: More accurate readings, theft-proof, no risk of damage at car wash

    After Installation: Drive for 5-10 minutes to activate sensors. You'll see real-time pressure, temperature, and leak alerts directly on your head unit screen!

    Front and Rear Camera Combo (Live View)
    ⚠️ Requires 4GB/64GB or Higher: Front camera LIVE VIEWING while driving requires 4GB RAM models. The dual camera live view system is NOT compatible with 2/32GB entry models. (Note: Dashcam recording is different and works on all models)

    Dual Camera Installation:

    1. Front Camera:
      • Mount behind rearview mirror area
      • Connect to dedicated front camera input on head unit
      • Route cable along windscreen edge and A-pillar
    2. Rear Camera:
      • Mount above license plate
      • Connect yellow RCA to rear CAM-IN
      • Connect red wire to reverse light for auto-switching
    3. Configure in Settings:
      • Set both cameras in Factory Settings
      • Enable split-screen view option
      • Configure switching behavior

    Benefits: View both cameras simultaneously, switch between them while driving, perfect for towing or tight parking.

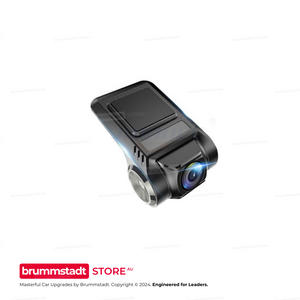
    Dashcam (Front Recording)
    ✅ Compatible with ALL models: Dashcam recording works perfectly on all models including 2/32GB. Records to SD card for incident protection.

    Installation Process:

    1. Mount the camera: Position behind rearview mirror for best view
      • Clean windscreen thoroughly
      • Attach using provided 3M adhesive mount
      • Ensure camera has clear view of road
    2. Connect power: Plug USB cable into head unit's USB port (any available port)
    3. Route cable: Tuck cable along windscreen edge and A-pillar trim to hide it
    4. Configure recording:
      • Open dashcam app on head unit
      • Set video quality (1080p recommended)
      • Enable loop recording (overwrites old footage)
      • Set G-sensor sensitivity for incident detection
    5. Storage: Records to the unit's internal storage (choose 4GB/64GB+ for longer recordings)

    Features: Continuous recording, automatic incident saving, parking surveillance mode when hardwired to constant power.

    Professional Installation Service
    What's Included in Professional Installation:
    • Complete head unit installation by certified technician
    • All accessories setup (cameras, microphone, DAB+, TPMS if ordered)
    • Professional cable management - all wires hidden
    • System configuration and testing
    • Tutorial on using all features
    • Warranty remains fully valid

    Installation Options:

    Standard Professional Installation ($500):
    You bring your vehicle to one of our certified installers. Installation typically takes 2-3 hours. Available in major cities across Australia.
    Home Service Installation ($200 - Selected Areas):
    • Gold Coast/Brisbane Area
    • Launceston Area
    Our mobile technician comes to your home or workplace. Same professional quality, maximum convenience.

    Booking: After purchase, we'll contact you within 24 hours to schedule your installation at a convenient time.

    RAM & Storage Options - Which to Choose?

    Quick heads up: The 2/32GB, 4/64GB or 8/128GB refers to the unit's built-in storage (like your phone's memory). This is permanent internal storage that can't be upgraded later.

    Which option suits you best?

    2GB RAM / 32GB Storage (Entry Level):
    • Basic CarPlay/Android Auto use only
    • Warning: May experience app refreshes or stuttering when multitasking
    • OK if you only use one app at a time
    • No 4G/SIM support at this level
    4GB RAM / 64GB Storage (Recommended):
    • Double the power - smooth multitasking
    • Run maps and music together without stutter
    • Includes 4G LTE & SIM card support
    • Room for apps and offline content
    • This is what most customers choose
    8GB RAM / 128GB Storage (Premium):
    • Power users and businesses
    • Run many apps simultaneously
    • Best for dashcam recording
    • Massive storage for offline maps
    • Future-proof choice

    💡 Pro Tip: The 2/32GB is really just an entry option. For proper multitasking without frustration, 4/64GB is the sweet spot!

    💡 Installation Tip: Most accessories connect directly with proper plugs. The rear camera may require connecting to your reverse light for automatic switching (basic wiring knowledge helpful). We include all necessary connectors and clear instructions.

    Place your order today and expect your parcel to arrive between Tuesday, 2 September and Tuesday, 9 September. Remote area deliveries might take just a little longer.

    The Ford Transit has consistently held a foundational role in automotive history, cherished globally for its adaptability, practicality, and continued evolution as a purpose-built vehicle. Renowned world-wide as an efficient transport solution, the Transit signifies reliability across various applications—be it commercial delivery, construction operations, people moving, or even recreational conversions. Known variably in regions as the Ford T-Series in early iterations in Australia, Transit Connect or Transit Custom depending on market segment and usage, this vehicle has invariably represented a blend of capable engineering and practical versatility.

    Historical Evolution of the Ford Transit Series:

    1. First Generation Transit – 1965-1978:
    Debuting initially in Europe, the Ford Transit was instantly appreciated for its spacious capacity, practical front-engine configuration, and broad adaptability. Its car-like handling coupled with significant payload capacity captured substantial market share, becoming popular among small businesses, delivery services, and tradespeople. The Transit swiftly gained a reputation for reliability, endurance, and day-to-day practicality.

    2. Second Generation Transit – 1978-1986:
    The second era saw progressive updates to design, powertrain, and user comfort. Improved visibility, cabin refinements, and increasingly diverse wheelbase options cemented the Transit’s wide acceptance. At this stage, Transit vans had become firmly established, trusted work vehicles throughout Europe, Asia, Australia, and various international markets experiencing rapid commercial expansion.

    3. Third & Fourth Generations – 1986-2000:
    In these generations, the Transit continuously evolved. More aerodynamic body designs enhanced fuel efficiency, while refinements in drivability and cabin ergonomics significantly boosted everyday usability. Diverse configurations allowed adaptation across all forms of commercial transport, elevating the Transit’s global esteem and market dominance in numerous commercial segments.

    4. Fifth Generation Transit – 2000-2013:
    Consistently evolving, the Transit at this stage matured considerably. Variations like Transit Jumbo and Tourneo people-mover variants expanded its flexibility, increasingly supported by improved safety standards, powerful diesel engines for better towing and payload capability, and repetition of fleet-friendly reliability and longevity. The Transit became irreplaceable for commercial fleets globally and earned the strong, loyal following it enjoys today.

    5. Sixth Generation Transit (2013-2017):
    Entering 2013, the Transit—available globally in configurations including panel van, crew-cab, minibus, and chassis-cab—further exemplified Ford's commitment to versatility, refinement, and dependability. Notably, this generation introduced two distinct variants: the full-sized Transit (often termed 'two-tonne' Transit) and the smaller, urban-focused Transit Custom. Globally, such as in regions of Australia, North America, Europe, and Asia, this flexible platform demonstrated marked improvements over prior models—cleaner, more fuel-efficient EcoBlue diesel engines, better ride comfort, upgraded interior design, and more sophisticated technology integrations. The interior functionality improved notably with ergonomic cabin layouts, comprehensive dashboard instrumentation, improved noise dampening, and substantial strides in cabin aesthetics.

    To complement and expand upon the robust capabilities and technical foundations of the Transit 2013-2017 model, many owners recognize meaningful benefits available from modernization and expansion of onboard technology. One exceptionally suitable option comes from Brummstadt: a specialized head unit, specifically fitting Transit interiors, engineered thoughtfully to ensure authentic integration and visual cohesion with the original dashboard aesthetics.

    Brummstadt's premium infotainment head unit represents considerable advancement over factory-standard audio and connectivity options. With wired and wireless Apple CarPlay and Android Auto compatibility designed into the system, this sophisticated solution greatly expands convenience and safety while driving. Drivers benefit from real-time traffic information and simplified navigation through popular mapping apps like Apple Maps, Google Maps, or WAZE. Imagine finishing an enjoyable dinner outing—before stepping into the Ford Transit, the next destination is comfortably entered on a smartphone. When entering the vehicle, destination details appear promptly on the head unit’s clearly illuminated screen, making travel seamless and intuitive, enabling passengers to remain relaxed without the concern of navigating busy streets manually.

    Additionally, Brummstadt’s system accommodates the option of integrating high-definition 1080p cameras, positioned strategically at both front and rear. These sophisticated cameras deliver clear recordings, providing valuable safety evidence in the unfortunate event of a road incident, parking scrape incidents, or ambiguous driving disputes. They bring peace-of-mind security that effectively complements the practical and versatile nature of the Transit itself.

    Moreover, the Brummstadt infotainment unit extends passenger enjoyment significantly further, offering entertaining features not often associated with vehicle travel. USB-connected joysticks allow passengers—on long-haul journeys or during extended commercial travel—to spend time engaging in multiplayer gaming displayed on the screen. This transforms mundane road trips into actively enjoyable moments, enhancing overall comfort for occupants.

    Equally intriguing, advanced voice control capabilities are seamlessly integrated, allowing intuitive interaction with digital assistants—such as Siri or Google Assistant—to manage onboard navigation, music selection, messaging, or calls. Vehicle-linked connectivity bridges seamlessly with smart home devices—imagine smoothly instructing, “Hey Siri, turn on the front porch lights," ensuring travelers return home to a safe and welcoming environment.

    Advantages and Driving Experience of the Ford Transit 2013-2017:

    The 2013-2017 Ford Transit provides exceptional operational dependability and flexible usage configurations, ideal for diverse lifestyles and industries. Brightly designed cabin spaces, refined drive dynamics, significant towing and payload capacities, and economical engine options have allowed Transit models to excel in myriad applications—from businesses requiring maximum efficiency to growing families seeking roomier, comfortable transport. Notably, Ford secured a unified global presence with this generation, offering broadly standardized offerings that still managed tailored adjustments to suit individual markets around the globe.

    Selecting thoughtful aftermarket technological components introduces renewed vigor into the vehicle—universally regarded as a reliable, user-centric choice. Implementing advanced infotainment integrations, such as the Brummstadt premium head unit, adds a further dimension to traveling comfort, entertainment, convenience, and connectivity. Trips become safer with enhanced navigation and clearer visibility, more comfortable with automatic connectivity integration, and significantly more pleasant through shared multimedia and gaming capabilities. In this way, Ford’s reliable and functional Transit vehicle becomes a personal reflection of individual usability preferences and considered technological advancement, creating an optimal environment for drivers and passengers alike.

    “A car is not just a tool — it’s an experience waiting to happen.”
    – Ken Block, World-renowned rally driver and viral motorsport icon


    Frequently Asked Questions

    Everything you need to know about this head unit

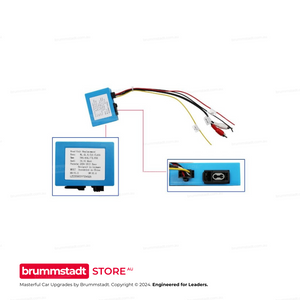
    Connect the single RCA cable with the yellow plug (included in your package) to extend your Bluetooth signal. This cable doubles as both a camera input AND a Bluetooth/WiFi antenna extension. The two small blue wires attached are antenna boosters that significantly improve connection stability. This simple connection takes 30 seconds and resolves 90% of Bluetooth issues. Make sure it's firmly connected even if you're not using a rear camera.

    Try these proven solutions:
    1. Quick Fix: Settings → Apps → Z-Link → Disable → Enable → Open (repeat each use)
    2. Check Cables: Use the data/charge USB cable (not charge-only)
    3. Bluetooth Setting: Disconnect all other Bluetooth connections - CarPlay needs exclusive access
    4. Factory Reset Z-Link: Find the pink 'RESET' app, restart, reconnect Bluetooth, then try Z-Link
    5. Sound Issues: Switch audio source to 'AUX' or 'USB/AUX' in your vehicle menu
    Most issues are resolved with step 1 or 3!

    The processor differs between models: The 2/32GB has a 4-Core processor, while 4/64GB and 8/128GB models feature the powerful 8-Core Cortex-A55 processor. Combined with RAM differences: The 2/32GB model with its 4-Core processor and limited RAM may experience slowdowns with heavy multitasking. The 4/64GB with 8-Core provides smooth performance for most users - no lag, seamless app switching, and enough storage for maps and music. The 8/128GB with 8-Core offers maximum performance with its generous RAM allowing unlimited multitasking and massive storage for extensive media libraries. Think of RAM like your desk space - more RAM means you can have more apps open simultaneously without slowing down.

    Absolutely normal! These head units are complete replacement systems with their own GPS antenna, microphone, and Bluetooth module. Your factory connectors for these features won't be needed anymore. The important connections are: main power harness, speaker outputs, and the yellow RCA cable (even if not using a camera - it extends Bluetooth range). Any leftover factory plugs can be safely tucked away. If you're unsure about any connection, our support team is here 7 days a week.

    Z-Link updates are handled through system firmware updates. Go to Settings → System → System Update. If an update is available, download it to a USB drive (FAT32 format) and install. Important: Never download Z-Link APKs from unofficial sources - they won't work and may cause issues. If you're having compatibility issues with newer iOS versions, the disable/enable workaround (Settings → Apps → Z-Link) usually resolves them while waiting for official updates.

    Consider your usage:
    2/32GB (4-Core): Budget option - fine for basic use, but may lag with multiple apps due to 4-Core processor and limited RAM
    4/64GB (8-Core): Sweet spot - smooth Android Auto/CarPlay, multitasking, and ample storage
    8/128GB (8-Core): Premium choice - unlimited multitasking, massive storage, future-proof for years

    Most customers choose 4/64GB for the perfect balance of performance and value. The extra RAM makes a huge difference in daily smoothness!

    The yellow RCA cable's blue antenna wires also boost WiFi signal! Make sure this cable is connected. Additionally, try these tips: Position the blue antenna wires away from metal surfaces, check that your phone's hotspot is set to 2.4GHz (not 5GHz) for better range, and ensure the head unit's WiFi sleep policy is set to 'Never' in Settings → WiFi → Advanced. For best performance with wireless CarPlay, keep your phone within 1-2 meters of the head unit.

    Go to Settings → Sound → Equalizer and adjust to your preference. For more volume, increase the 'Loudness' setting. The 4/64GB and 8/128GB models have superior audio chips that provide cleaner, louder sound. If you have an amplifier, use the RCA outputs for best quality. Also check Settings → Factory Settings (password usually 126) → Audio settings for additional gain controls. Remember: higher-spec models (4GB+) include premium audio components for noticeably better sound.

    Yes! Most vehicles work instantly. If not, use the steering wheel learning app: tap the steering wheel icon, press each button on your wheel, and assign functions. For newer vehicles with CANbus, we provide CANbus modules for automatic setup. Some vehicles may need the Key1/Key2 wires connected (usually included in our harness). If you're having trouble, let us know your exact vehicle model and we'll provide specific instructions.

    We offer a 30-day return policy. If it doesn't fit or there's a compatibility issue, we'll work with you to resolve it. If you change your mind, a 20% restocking fee applies. Our team verifies compatibility before shipping to minimize issues. We provide installation support 7 days a week to help resolve any problems. With our 3-year warranty and Australian-based support, you can purchase with confidence. Full details in our Refund Policy.

    Ford Transit 2013-2017 - Premium Head Unit Upgrade Kit: Radio Infotainment System with Wired & Wireless Apple CarPlay and Android Auto Compatibility - baeumer technologies
    Ford Transit 2013-2017 - Premium Head Unit Upgrade Kit: Radio Infotainment System with Wired & Wireless Apple CarPlay and Android Auto Compatibility
    local_offer

    Recently viewed